This was a bit of fun to do. I am not much of a post editing sort of guy, I don't even own Photoshop. However, I will use the open source equivalent in Gimp.
How it was done:
Position self.
Check settings on camera for Hi-speed shutter.
Shoot as subject doesn't break himself.
At home, research the heck out of Layer masking.
In Gimp, you can import several photos as layers. Nice.
To each layer I applied a layer mask, making it dark. Gimp made the last photo in the series, where JJ landed, the background image.
So when I went to each layer, I simply panted to reveal that version of him. It got tricky when they overlapped.
Turned out pretty good, and lesson learned on how to make the image!
Monday, November 30, 2009

Monday, November 23, 2009
Links
With late fall here, interesting nature images are in a bit of a lull for me. I haven't taken my camera with me the past two times going for river walks with my dog, and not disappointed about the decision. The last one I didn't see something other than a mallard until ten minutes left. Sad really...
On the positive side I have gotten some really nice photos of my daughter while she plays. As she is a tad lower to the ground than most subjects, I am trying a new method of lighting her. I am still using my shoot through umbrella, but I am putting it on the ground angled up. I simply put the strobe on the floor, and angle the head to match the incline of the umbrella. The resulting light has been just spot on and wonderfully soft.
Links:
- ShutterBuddy Attacks Baby Photo ADD Issue with Simplicity- Gizmodo; Interesting idea. Though I think some toys might be more effective.
- Flickr Chooses Snapfish As Its Preferred Printing Partner- Photography Blog; I guess Qoop has flown the coop. (oh come on, like you weren't thinking the same.) Qoop used to be the primary print function for Flickr.
- Adobe Debuts Photoshop.com Mobile for Android- Photography Blogl; Its coming... mobile Photoshop. Not sure if it will get past the basics (i.e. straighten and crop), but time will tell.
- Portrait Photography In The Eyes Of 5 Years Olds- DIYPhotography; That is just fantastic. I love it.
- Mini Review of the Spyder3 Express- PhotoFocus; I think I need to invest in a monitor calibration tool like this. And the price is pretty darn good considering what it can do for you.
Saturday, November 14, 2009
Camera cleaning
I am not referring to making sure there is no dirt on the camera, but rather that the camera sensor is relatively clean of dust and other particulars. I have a Canon 30D, before they introduced the 'micro shake' of the sensor to have small dust drop off every time the camera is turned on.
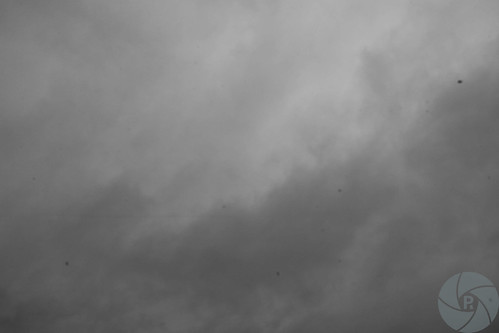
 I can tell there is stuff on my sensor when the specs show up in shots. I then turn to this shooting to confirm: on a solid sky in the day, push up the F/ to about 15+, and snap. Today the result was this:
Specs all over the place! On no!
When I first encountered this problem, I wasn't sure what I could do. I thought about canned air, but decided against that.
I read up on the issue, and discovered the Gitzo Air Blower. For a Canon, there was a setting for clean sensor. It would cause the reflector mirror to lock up in place exposing the sensor for cleaning. I would turn the body so the sensor would face down, and be careful not to get the blow any close to the sensor than I had to. Then I would have blower do its thing. At first this was enough for me.
After a few times of doing the blower method, it provided to be not enough to clean it properly. I did more research. Some folks refused to do it themselves, and sent the camera body in to a shop to have it professionally cleaned. Then again, most of those folks either had the money or photography was their livelihood and depended on super clean images. Another crowd recommended doing a more through cleaning by hand. I tracked down one cleaning kit from Copper Hill Images.
I picked up a kit and got nervous. I read horror stories of people who did something wrong and scratched the surface of the sensor... or whatever. For the Copper Hill kit, there were two levels of cleaning- a brush that worked with static cling, and the other that worked with a lint free cloth and a solution. So combined with my blower, I was up to three levels of cleaning.
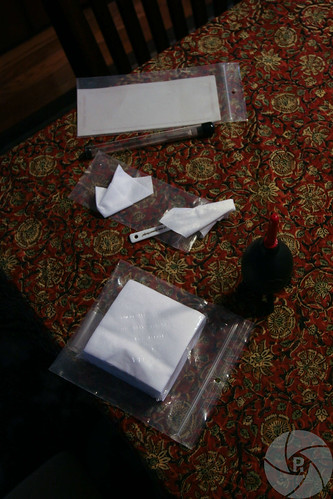
Here is the results of today's cleaning from all three, because they were all needed:

I also try two different lenses on the camera, just to make sure the dirt isn't on the lens. You never know!
Finally, here is what the table looked like when I was done cleaning:

Don't get me wrong, sending it in to get it cleaned professionally is great. I have done that once when I was getting another issue taken care of. However, I know that isn't always the best answer. Between time, money, and effort, I am taking the home cleaning first. If it is something beyond my skills, then I have no problem sending it off. Just realize that the sensor is everything for your camera. It isn't like you can just stick a fresh roll of film in if you mess up!
 I can tell there is stuff on my sensor when the specs show up in shots. I then turn to this shooting to confirm: on a solid sky in the day, push up the F/ to about 15+, and snap. Today the result was this:
Specs all over the place! On no!
When I first encountered this problem, I wasn't sure what I could do. I thought about canned air, but decided against that.
I read up on the issue, and discovered the Gitzo Air Blower. For a Canon, there was a setting for clean sensor. It would cause the reflector mirror to lock up in place exposing the sensor for cleaning. I would turn the body so the sensor would face down, and be careful not to get the blow any close to the sensor than I had to. Then I would have blower do its thing. At first this was enough for me.
After a few times of doing the blower method, it provided to be not enough to clean it properly. I did more research. Some folks refused to do it themselves, and sent the camera body in to a shop to have it professionally cleaned. Then again, most of those folks either had the money or photography was their livelihood and depended on super clean images. Another crowd recommended doing a more through cleaning by hand. I tracked down one cleaning kit from Copper Hill Images.
I picked up a kit and got nervous. I read horror stories of people who did something wrong and scratched the surface of the sensor... or whatever. For the Copper Hill kit, there were two levels of cleaning- a brush that worked with static cling, and the other that worked with a lint free cloth and a solution. So combined with my blower, I was up to three levels of cleaning.
Here is the results of today's cleaning from all three, because they were all needed:

I also try two different lenses on the camera, just to make sure the dirt isn't on the lens. You never know!
Finally, here is what the table looked like when I was done cleaning:
Thursday, November 5, 2009
Links
I am working on a photo-related announcement, but until everything is in place I don't want to jump the gun. Lets just say- I am super excited about it if it proves to be true!
Here are some new photo related links I have discovered:

- PhotoTune 3- PhotographyBlog; Not so much the software involved- however cool, it is the location of the sample images. Here is my take on the same location- still wished I had taken my tripod!
- What the Duck just slays me, SLAYS me.
- Kelby Tours, DC Stop- Joe McNally; I see these examples and wish someone could have videoed the setup. I learn SO MUCH better when I work backwards- see the image, see the setup, try myself, repeate. The problem is the last setp- being able to repeate the look. That takes practice and re-examing the example. Hence the video.Also why I loved the Strobist videos.
- A Beginner’s Guide to Flickr- DPS; I joined Flickr back in 2003- over six years ago. So I have just 'grown up' with it. I know it farely well, but this guide helps reinforce that it does things well and how. I just recall losing hours clicking from photo, to stream, to sets, to groups... yikes.
- 5 Tips for Photographing Children- DPS; I was able to take some tips from this very article for a inpromtu Halloween party shoot. Getting them to relax in front of a stranger was the hardest. I busted out the, "Who is your favorite Disney character..." question. That seemed to relax the girls dressed up as princesses.
- I want to practice with a fill light source some soon. I have a nice sheet of coroplast for just that purpose. I think I want to try bouncing a light off the ceiling, and using the sheet to bounce from the ground to under the face. Just creating some fill light. Not sure of the settings yet, but thinking 1/2 strobe power off the ceiling, with 1/100 f/5.6 for starters and see how that goes. Single strobe. Subject might be my daughter sitting in her bumbo seat. Or my normal subject- my dog.
Here are some new photo related links I have discovered:
- What the Duck just slays me, SLAYS me.
- Kelby Tours, DC Stop- Joe McNally; I see these examples and wish someone could have videoed the setup. I learn SO MUCH better when I work backwards- see the image, see the setup, try myself, repeate. The problem is the last setp- being able to repeate the look. That takes practice and re-examing the example. Hence the video.Also why I loved the Strobist videos.
- A Beginner’s Guide to Flickr- DPS; I joined Flickr back in 2003- over six years ago. So I have just 'grown up' with it. I know it farely well, but this guide helps reinforce that it does things well and how. I just recall losing hours clicking from photo, to stream, to sets, to groups... yikes.
- 5 Tips for Photographing Children- DPS; I was able to take some tips from this very article for a inpromtu Halloween party shoot. Getting them to relax in front of a stranger was the hardest. I busted out the, "Who is your favorite Disney character..." question. That seemed to relax the girls dressed up as princesses.
- I want to practice with a fill light source some soon. I have a nice sheet of coroplast for just that purpose. I think I want to try bouncing a light off the ceiling, and using the sheet to bounce from the ground to under the face. Just creating some fill light. Not sure of the settings yet, but thinking 1/2 strobe power off the ceiling, with 1/100 f/5.6 for starters and see how that goes. Single strobe. Subject might be my daughter sitting in her bumbo seat. Or my normal subject- my dog.
Subscribe to:
Posts (Atom)