So my birthday just passed and I got some cash to buy photo gear. I know what I would LIKE to get, however the budget is not that expansive! I would love to get the Canon 5D Mark II, or the 24-70mm f/2.8, but that is not realistic at all. Not when the lens is about $1300 and the Canon body is $2500.
What can I get that is cheaper and usable? Now that is a pickle.
So far I have decided on:
Op/Tec raincover
Digital Timer Remote
Two new replacement Batteries
Some Conkin P series adapters for my 70-200 lens
I am debating on several other items, such as an additional Compact Flash card, maybe trying out a cheapie beauty dish/ring light. But the debate rages in my head on what would make photographing the kids easier. At this point, unless I get a separate high ceiling room in my house with a full-time setup for portraits, not much rings a bell for me right now.
I've built some DIY gear like gridspots, light tent, gels for strobes, and some other fun stuff. But how much homemade stuff can I do?
So basically I have hit a practical wall- there are not much else I can do with small items unless I spend more time and energy to put in to the hobby to learn and grow more. I am very comfortable with my results, but I know I can do better. So whats next? I don't know if I can get there from here with the time and energy I have available.
Maybe I should just get a nice new hiking camera bag.
Wednesday, May 18, 2011
Tuesday, May 10, 2011
New soup container Strobist style hack
A friend bought some PF Changs for us, and one of the items was in a large soup container. My mind was working once I saw it. I have done a "similar" mod to a smaller soup container. But this one was more of a portrait style light mod.
Disclaimer- yes, it does look silly. Show up with this to a paid gig and prepared to be laughed at. However, the same can be said of the Fong stuff. People say it looks like a taco tip container!
So here is the setup:

What you can see is the soup container with a dual paint job. Inside is half painted white with plastic friendly spray paint. The outside is half painted with plastic friendly spray paint. The top is the same but it is completely covered to help bounce the light out the front.
I measured my strobe on the bottom, and cut out with a box cutter. (very carefully!)
First, here is a bounce light shot:

While very easy and helpful, there are always shadows on people's face. This is caused by the light coming from above and not in front. A straight up strobe to the face is usually over whelming.
Setting up an umbrella is not always easy nor quick. So I thought, why not try to do a quick and dirty mod?
Here is the result:

Not saying it is perfect, but it is a drastic improvement in the quality of the light source.
The downfall is that the strobe has to stay in one direction- I cannot go to horizontal grip for shots with this mod. If I did, I would be lighting to the side and not the front!
[update with self photos, thank goodness for timers]
1/8 power bounce off ceiling:

Notice the shadows and barely lit. Normally in these conditions I go up to 1/4 power and adjust from there.
Strobe test- 1/8 power with mod:

Strobe test- 1/8 power direct with built in diffuser:

Strobe test- 1/8 power direct:

And yes, I couldn't see for a little bit. Yozzers.
Disclaimer- yes, it does look silly. Show up with this to a paid gig and prepared to be laughed at. However, the same can be said of the Fong stuff. People say it looks like a taco tip container!
So here is the setup:

What you can see is the soup container with a dual paint job. Inside is half painted white with plastic friendly spray paint. The outside is half painted with plastic friendly spray paint. The top is the same but it is completely covered to help bounce the light out the front.
I measured my strobe on the bottom, and cut out with a box cutter. (very carefully!)
First, here is a bounce light shot:
While very easy and helpful, there are always shadows on people's face. This is caused by the light coming from above and not in front. A straight up strobe to the face is usually over whelming.
Setting up an umbrella is not always easy nor quick. So I thought, why not try to do a quick and dirty mod?
Here is the result:
Not saying it is perfect, but it is a drastic improvement in the quality of the light source.
The downfall is that the strobe has to stay in one direction- I cannot go to horizontal grip for shots with this mod. If I did, I would be lighting to the side and not the front!
[update with self photos, thank goodness for timers]
1/8 power bounce off ceiling:
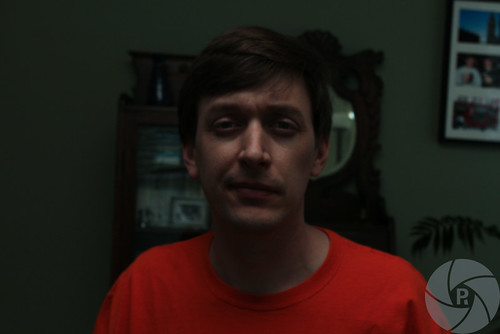
Notice the shadows and barely lit. Normally in these conditions I go up to 1/4 power and adjust from there.
Strobe test- 1/8 power with mod:

Strobe test- 1/8 power direct with built in diffuser:

Strobe test- 1/8 power direct:

And yes, I couldn't see for a little bit. Yozzers.
Subscribe to:
Posts (Atom)